
How to Fix Peeling Paint on Walls
Key Highlights
- Proper surface preparation is crucial to prevent peeling paint from recurring.
- Moisture issues are a common cause of peeling paint and should be addressed before repainting.
- Using quality primer and paint ensures better adhesion and a longer-lasting finish.
- Regular maintenance and early intervention can prevent minor paint issues from becoming major problems.
How to Fix Peeling Paint
Understanding the Problem of Peeling Paint
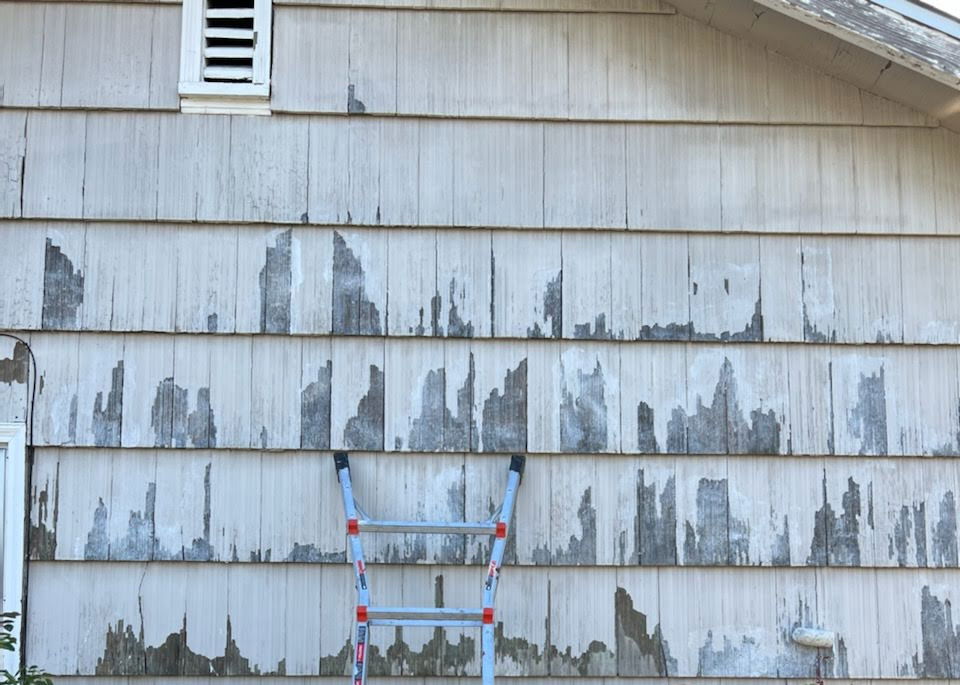
Peeling paint is one of those frustrating issues that most homeowners encounter at some point. Whether it’s in the bathroom, where moisture wreaks havoc, or on an exterior wall that’s exposed to the elements, peeling paint not only looks unsightly but can also signal deeper problems. Addressing peeling paint promptly is crucial, not just for aesthetics but for the overall health of your walls. If left unchecked, peeling paint can lead to further damage, such as mold growth or even structural issues. Proper preparation and repair can restore both the appearance and integrity of your walls, making them look as good as new.
Identifying the Cause of Peeling Paint
Before diving into solutions, it’s important to understand why the paint is peeling in the first place. Identifying the underlying cause can help you prevent the problem from recurring after you’ve repaired the surface.
Why Does Paint Peel? Common Causes
Peeling paint doesn’t just happen out of the blue; it’s often the result of specific issues that compromise the adhesion of the paint to the surface. Let’s explore some of the most common causes.
Moisture Issues
Moisture is one of the leading culprits behind peeling paint. Whether it’s due to a leaky roof, high humidity levels, or inadequate ventilation, moisture can seep into your walls and weaken the bond between the paint and the surface. Over time, this causes the paint to bubble and eventually peel away.
I’ve seen many cases where peeling paint was a direct result of unseen water damage. Often, the homeowner would repaint, only to find the problem resurfacing within a few months. The key to solving this issue is to first identify and fix the source of the moisture. This might involve repairing leaks, improving ventilation, or even installing a dehumidifier in particularly humid areas. Once the moisture problem is addressed, you can proceed with repainting, knowing that your new paint job will stand the test of time.
Things to Know
- Proper Tools Are Key: Using the right tools such as scrapers, sandpaper, and appropriate primers can significantly affect the success of your paint repair.
- Address Moisture First: If moisture is the cause of peeling, it must be resolved before any repainting is done to prevent future issues.
- Quality Matters: Investing in high-quality paint and supplies is crucial for long-term durability and satisfaction.
- Safety First: Always prioritize safety, especially when dealing with older paints that might contain lead, by using masks and proper ventilation.
- When to Call Professionals: Consider professional help for extensive damage, complex issues, or if you're unsure about the correct procedures.
Poor Surface Preparation
Another common reason for peeling paint is poor surface preparation. I can’t stress enough how critical it is to properly prepare your surfaces before painting. This includes cleaning the walls thoroughly to remove dirt, grease, and dust that could interfere with paint adhesion. Inadequate surface preparation often results in poor adhesion, with the paint lifting and peeling off shortly after it’s applied.
Incompatible Paint Layers
Sometimes, peeling paint is caused by using incompatible paint types or applying new paint over old, deteriorating layers. Not all paints are created equal, and mixing different types—such as applying latex paint over oil-based paint—can cause the layers to separate and peel.
Additionally, applying new paint over old paint that’s already flaking or deteriorating will likely lead to further peeling. Before repainting, it’s essential to remove any loose or peeling paint, sand the surface smooth, and apply a compatible primer. This will create a solid foundation for your new paint and prevent peeling down the road.
Structural Issues
Structural issues can also contribute to peeling paint. Cracks in the walls, shifting foundations, or general structural movement can cause the paint to crack and peel away. If your home is settling or if you’ve noticed cracks in the walls, these issues need to be addressed before repainting.
In some cases, the solution might involve repairing the cracks with appropriate fillers and ensuring that the structure is stable. Once the structural issues are resolved, you can proceed with repainting, confident that your efforts won’t be undone by underlying problems.
In Our Experience:
"We've tackled numerous projects where peeling paint was a major concern. Our approach always starts with understanding the underlying cause, whether it's moisture, poor adhesion, or improper application. By addressing these root issues with thorough preparation and the right materials, we ensure lasting results that not only look great but also stand up over time."
Gathering the Necessary Tools and Materials
Essential Tools and Materials for Fixing Peeling Paint
Before you dive into fixing peeling paint on your walls, it's important to gather all the necessary tools and materials. Having everything you need on hand will make the process smoother and help you achieve a professional-quality finish.
What You’ll Need
To tackle peeling paint, you'll need a few essential tools and materials:
- Putty Knife or Paint Scraper: These tools are crucial for removing loose and peeling paint without damaging the underlying surface.
- Sandpaper: Sandpaper, preferably in varying grits, will help smooth out rough edges and prepare the surface for priming and painting. A medium grit (around 120) is great for general smoothing, while finer grits (220 or above) can be used for finishing touches.
- Primer: A high-quality primer is essential for ensuring that the new paint adheres properly and lasts longer. Be sure to select a primer that's compatible with your wall type—whether it's drywall, wood, or plaster.
- Paint: Choose paint that matches your existing wall color or the new color you’re aiming for. Quality matters here, so opt for a durable, washable paint that can stand up to the test of time.
- Patching Compound: If there are cracks or holes in the wall, you'll need a patching compound to repair them before priming and painting.
- Drop Cloths and Tape: These will protect your floors, furniture, and trim from paint splatters and drips.
Safety First
Safety is paramount when dealing with any home repair project. Here are a few tips to keep in mind:
- Wear a Dust Mask: Sanding can kick up a lot of dust, especially if you’re dealing with old paint. A dust mask will protect your lungs from inhaling harmful particles.
- Use Gloves: When scraping and sanding, gloves will protect your hands from cuts and abrasions.
- Check for Lead Paint: If your home was built before 1978, there's a chance that the old paint contains lead. In such cases, it’s best to consult a professional to handle the removal safely.
How to Fix Peeling Paint on Walls
Now that you have all your tools and materials ready, it’s time to get to work. Follow this step-by-step guide to fix peeling paint and restore your walls to their former glory.
H3: Step 1: Prepare the Area
Preparation is key to any successful painting project. Start by removing furniture and covering the floor with drop cloths to protect them from dust and paint splatters. Use painter’s tape to cover baseboards, trim, and any other areas you want to keep paint-free.
H3: Step 2: Remove Loose Paint
Using a putty knife or paint scraper, gently scrape away any loose or peeling paint. Be careful not to gouge the wall surface—your goal is to remove only the paint that’s already detached from the wall. If the paint is stubborn, apply a bit more pressure, but work slowly to avoid damaging the underlying material.
H3: Step 3: Sand the Area
After removing the loose paint, use sandpaper to smooth the edges around the peeled area. This step is crucial for ensuring that the surface is even and ready for painting. Start with medium-grit sandpaper to remove any rough spots, then switch to a finer grit for a smooth finish. Wipe away any dust with a damp cloth before moving on to the next step.
H3: Step 4: Repair and Prime
If you find any cracks or holes in the wall, now is the time to repair them using a patching compound. Apply the compound with a putty knife, smoothing it over the damaged area. Once it’s dry, sand it lightly to blend it with the surrounding wall.Next, apply a coat of primer to the repaired area. Priming is essential for ensuring that the new paint adheres well and has a consistent finish. Be sure to choose a primer that’s suited for your specific wall type, whether it’s drywall, wood, or plaster.
H3: Step 5: Repaint the Area
Finally, it’s time to repaint. Use a high-quality paint that matches the existing wall color or apply a fresh new color. When painting over the primed area, feather the edges to blend the new paint seamlessly with the old. This technique helps to avoid any visible lines or color discrepancies, giving your wall a uniform appearance. Apply the paint in thin, even coats, allowing each coat to dry completely before applying the next.
Preventing Future Peeling
Tips for Preventing Peeling Paint in the Future
Fixing peeling paint is one thing, but preventing it from happening again is where the real victory lies. Over the years, I’ve seen many homeowners frustrated by peeling paint that returns again and again, often due to underlying issues that go unaddressed. With the right approach, though, you can keep your walls looking fresh and flawless for years to come. Here are some tried-and-true tips for preventing peeling paint in the future.
Maintain Proper Humidity Levels
One of the most common causes of peeling paint is moisture. Whether it’s from a steamy bathroom, a damp basement, or just the overall humidity in your home, excess moisture can wreak havoc on your paint job. To prevent moisture-related peeling, it’s essential to maintain appropriate humidity levels throughout your home.
For areas like bathrooms and kitchens, where moisture tends to accumulate, make sure you have proper ventilation in place. Installing or using exhaust fans can make a significant difference. In other parts of the house, consider using dehumidifiers to keep the air dry. I’ve often recommended this to clients living in humid climates or older homes where moisture can easily seep into walls. By keeping humidity in check, you not only protect your paint but also prevent other potential issues like mold and mildew.
Regular Inspection and Maintenance
Another key to preventing peeling paint is regular inspection and maintenance. It’s much easier—and less expensive—to deal with small issues before they become major problems. Make it a habit to inspect your walls periodically for early signs of peeling, cracking, or bubbling paint.
If you spot any areas that seem to be at risk, don’t wait to take action. Touch up small areas of peeling paint as soon as you notice them. This might involve lightly sanding the area, applying a quality primer, and repainting. By addressing these small issues right away, you can stop them from spreading and avoid the need for more extensive repairs down the road.
Use Quality Paint and Primer
I can’t stress enough how important it is to invest in high-quality paint and primer. While it might be tempting to cut costs with cheaper products, the truth is that you often get what you pay for. Quality paint and primer are formulated to adhere better, resist moisture, and maintain their finish longer than their lower-cost counterparts.
When selecting paint, look for options that are specifically designed for the environment in which they’ll be used. For example, if you’re painting a bathroom or kitchen, choose a paint that’s moisture-resistant. The same goes for primer—using a high-quality primer suited to your wall type and paint choice can make all the difference in ensuring that your paint job lasts.Investing in quality products might seem like an added expense, but in the long run, it saves you time, money, and frustration by reducing the likelihood of peeling and the need for frequent touch-ups or repainting.
Bringing Your Walls Back to Life
Fixing peeling paint is just the first step in restoring the beauty and integrity of your walls. By focusing on proper preparation and prevention, you can keep your home looking its best for years to come. Start by addressing any underlying issues, such as moisture or poor ventilation, and commit to regular maintenance and inspections. Remember, using high-quality paint and primer is an investment in the longevity of your walls—one that pays off every time you walk into a room and see a smooth, flawless finish.
If you’re dealing with a small area of peeling paint, DIY solutions can often do the trick. However, for more extensive or challenging projects, don’t hesitate to seek professional help. At Lightmen Painting, we’re here to ensure your paint job not only looks fantastic but also stands the test of time. Whether you need advice, touch-up services, or a complete repaint, we’re just a call away. Let’s work together to bring your walls back to life—and keep them that way.
Do You Have Questions? Give Us A Call With Any & All! 503-389-5758
-
People Also Ask:
What causes paint to start peeling off walls?
Paint peels off walls primarily due to moisture issues, poor surface preparation, incompatible paint types, or underlying structural problems. Ensuring the surface is dry, clean, and stable before painting can help prevent peeling.
Can I fix peeling paint by myself?
Yes, fixing peeling paint can be a DIY project if you have the right tools and materials. This includes a scraper, sandpaper, primer, and the correct type of paint. Follow detailed steps to remove loose paint, prepare the surface, and apply new paint for best results.
How can I prevent paint from peeling in the future?
Prevent paint from peeling by maintaining proper indoor humidity, using high-quality paint and primer, and ensuring good ventilation, especially in high-moisture areas like kitchens and bathrooms. Regular inspections can catch and mitigate potential problems early.
-
SUBSCRIBE TO OUR BLOG: Stay informed with the latest in Painting and DIY projects by subscribing to Lightmen Painting. Get insights, tips, and more delivered straight to your inbox. We would also love to know what you would like to read about, leave thoughts on where we should go next. Interests, Topics, Ideas, all are welcome.
If your in the Portland, Or. area and need advice or a free no obligation estimate call us at 503-389-5758 or email scheduling@lightmenpainting.com
Shout Out:
Celebrating Pizzazz Painting: Your Expert Source for House Painting Tips
From the team at Lightmen Painting, we extend our highest praise to Pizzazz Painting for their dedication to providing actionable house painting advice through their expert blogs. Just as we strive for excellence and precision in our painting services, Pizzazz Painting offers valuable insights on both interior and exterior painting projects, helping homeowners achieve professional-quality results. Their commitment to educating clients and delivering top-notch service aligns perfectly with our mission to enhance and beautify every space.
Thanks for stopping by Lightmen Daily! Stay tuned for more practical tips and expert advice on making your painting projects flawless, from wall to floor!
Definitions
- Peeling Paint: Paint that comes off a surface in strips or flakes due to poor adhesion or environmental factors.
- Moisture Issues: Problems caused by excessive humidity or water exposure that adversely affect paint adhesion.
- Surface Preparation: The process of cleaning, smoothing, and priming a surface before painting to ensure optimal paint adhesion.
- Incompatible Paints: Different types of paint that, when layered, do not adhere well together, often causing peeling or cracking.
- Structural Movement: Shifts in a building’s structure that can lead to cracks and gaps in painted surfaces.
- Patching Compound: A material used to fill cracks or holes in walls before painting to create a smooth surface.
- Primer: A preparatory coating applied before painting to improve adhesion, increase durability, and provide additional protection.
- Dehumidifier: A device used to reduce and maintain the level of humidity in the air, typically for health or comfort reasons, or to eliminate musty odor.
- Feathering Technique: A painting technique used to blend new paint with old to create a seamless finish.
- Humidity Levels: The amount of water vapor present in the air, which can affect paint drying and adhesion.
Lightmen Painting Serving: Portland, Tigard, Lake Oswego, Tualatin, West Linn, Milwaukie, Sherwood, Happy Valley, Oregon City, Beaverton, Hillsboro, Gresham -Trade Partners-