5 Common Taping Mistakes and How to Avoid Them
Key Highlights
- Understanding the importance of proper taping in painting projects.
- Common taping mistakes and how to avoid them.
- Lightmen Painting’s professional techniques and materials for flawless results.
- Practical tips for DIY enthusiasts to achieve professional-quality taping.
How to Avoid 5 Common Taping Mistakes
One of the most memorable lessons I learned in my early painting days came from a simple yet costly mistake with taping. I once rushed through the process, thinking it wasn’t a big deal, and ended up spending more time fixing the mess than I did painting. That’s when I realized the true importance of proper taping in painting projects. Taping might seem tedious, but it's crucial for achieving that flawless, professional finish. Here at Lightmen Painting, we pride ourselves on our meticulous attention to detail, including mastering the art of taping to avoid these common mistakes.
The Significance of Taping in Painting Projects
Achieving Clean Lines
Clean, straight lines are the hallmark of a professional paint job. Proper taping is essential for this. When you tape correctly, you ensure that your edges are sharp and well-defined, creating a polished look. Imagine comparing a wall with crisp, clean lines to one with wavy or smudged edges; the difference is night and day.
Protecting Surfaces
Taping is not just about aesthetics; it's also about protecting areas that shouldn’t be painted. This includes trim, ceilings, and fixtures. Without proper taping, you risk painting over these areas, leading to extensive and frustrating cleanup. For instance, I once forgot to tape off a light fixture, and cleaning the dried paint off later was a nightmare. Proper taping saves you from these headaches and ensures your work looks clean and professional.

Common Taping Mistakes and How to Avoid Them
When it comes to achieving a professional paint finish, proper taping is essential. Yet, many DIYers and even some professionals make common mistakes that can lead to frustrating results. Let’s dive into these common taping errors and how to avoid them to ensure your painting project looks flawless.
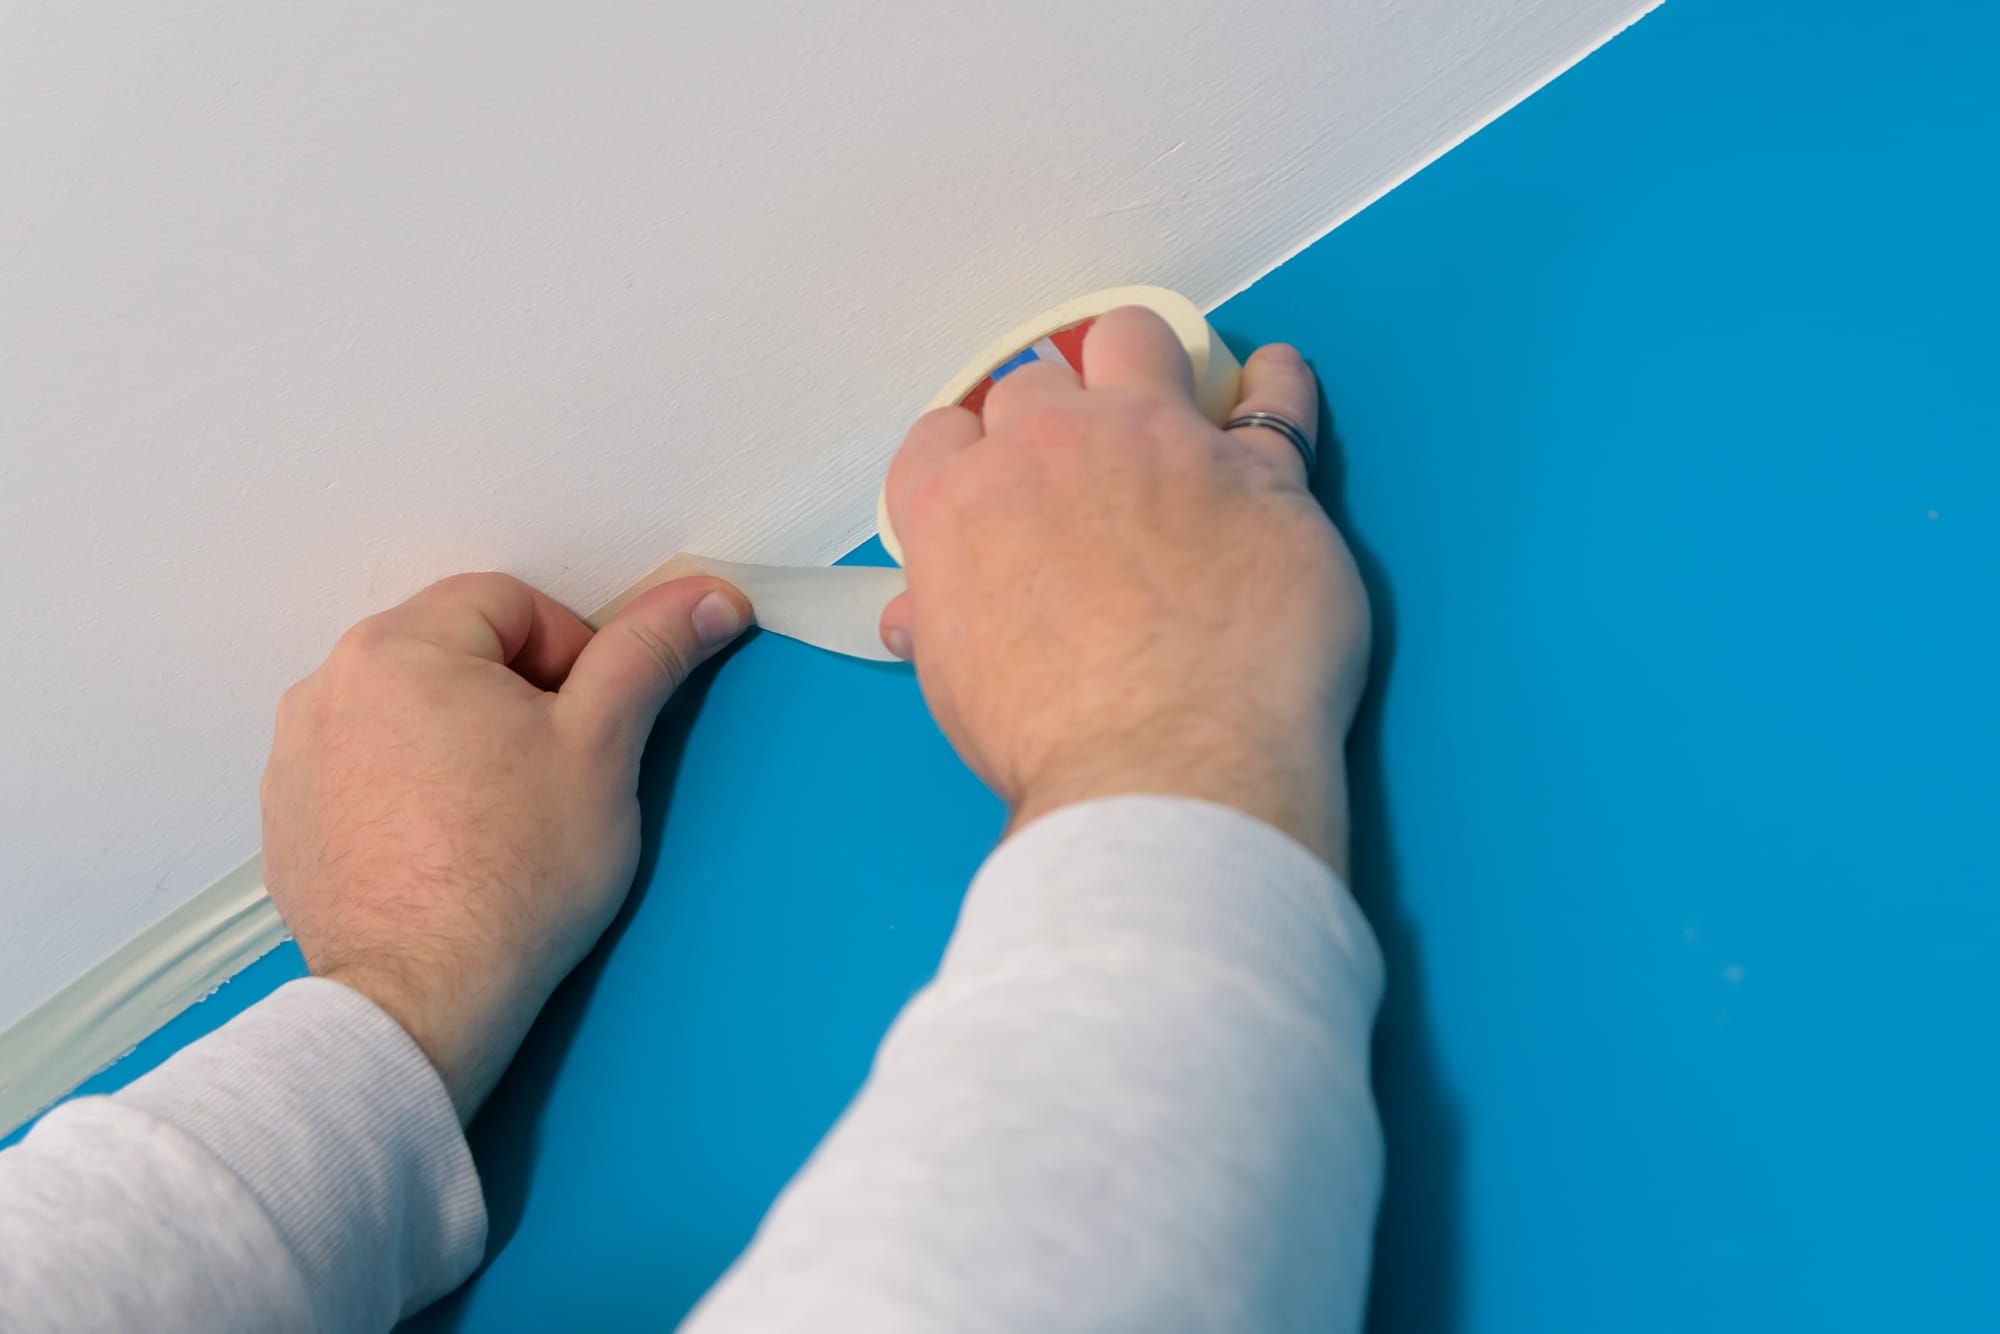
Using the Wrong Tape
Mistake: Using general-purpose tape instead of painter’s tape.
Solution: Always use high-quality painter’s tape designed for your specific surfaces.I remember a project where I ran out of painter’s tape and decided to use some masking tape I had lying around. Big mistake! The paint bled through the tape, and when I removed it, it peeled off chunks of paint along with it. Since then, I always make sure to have an ample supply of high-quality painter’s tape like FrogTape or 3M ScotchBlue. These tapes are designed to adhere well and come off cleanly, ensuring sharp lines and no damage to your surfaces.
Not Preparing the Surface Properly
Mistake: Applying tape to dirty or wet surfaces.
Solution: Clean and dry surfaces thoroughly before taping to ensure proper adhesion.Proper surface preparation is key to effective taping. Dust, grease, or moisture can prevent tape from sticking properly, leading to paint bleeding underneath. Once, I started taping a room without wiping down the baseboards first. The tape barely stuck, and paint seeped under the edges, creating a mess. Now, I always clean the area with a damp cloth and let it dry completely before applying tape.
Applying Tape Incorrectly
Mistake: Stretching the tape while applying it, leading to gaps and uneven lines.
Solution: Gently press the tape down as you apply it, ensuring it sticks smoothly without stretching.Stretching the tape as you apply it can cause it to lift off the surface, leading to paint bleeding underneath. Instead, gently press the tape down as you apply it, ensuring it sticks smoothly and evenly. I once helped a friend with a DIY project where they stretched the tape too tight. The resulting paint lines were wavy and uneven. We had to redo the entire edge, which was both time-consuming and frustrating.
Skipping the Seal Step
Mistake: Not sealing the edges of the tape to prevent paint bleed.
Solution: Use a putty knife or your fingernail to firmly seal the tape edges.Sealing the edges of the tape is crucial to prevent paint from seeping underneath. Simply run a putty knife or your fingernail along the edge of the tape to ensure it’s firmly sealed. I learned this the hard way when I skipped this step on a ceiling job. The paint bled under the tape, and I had to touch up the entire edge, which could have been easily avoided.
Removing Tape Too Late or Too Early
Mistake: Removing tape when the paint is either too wet or too dry, causing peeling or tearing.
Solution: Wait for the paint to be dry to the touch but still slightly pliable, and remove the tape at a 45-degree angle.Timing is everything when it comes to removing tape. If you remove it too soon, the paint can smear; if you wait too long, the paint can peel off with the tape. The best time to remove tape is when the paint is dry to the touch but still slightly pliable. This typically means waiting about an hour after painting. Remove the tape slowly at a 45-degree angle to minimize the risk of peeling.
In Our Experience:
"We've learned that the key to a successful and pain-free painting project lies not just in the skills and techniques used, but significantly in the preparation and tools employed. Ergonomic tools have been game changers, drastically reducing the physical toll on our team. Good posture and regular breaks have similarly contributed to maintaining our painters' health and enhancing their efficiency. This approach has not only improved our work quality but has also significantly reduced the downtime caused by injuries. Our commitment to ergonomic practices and proper posture is a testament to our dedication to both excellence in craftsmanship and the wellbeing of our team."
Lightmen Painting’s Expertise in Taping
When it comes to achieving a flawless paint job, precise taping is essential. We take pride in our meticulous approach to taping, ensuring crisp lines and a professional finish every time. Let’s dive into the techniques, materials, and expertise that set us apart.
Professional Techniques
Description of the Advanced Taping Techniques Used by Lightmen Painting
Our team at Lightmen Painting uses advanced taping techniques to achieve perfect edges and seamless transitions between different surfaces and colors. One of our key methods involves the “lock and load” technique, where we apply tape firmly and then use a putty knife to press down the edges, ensuring a tight seal to prevent any paint bleed. We also employ the “score and peel” method for clean, straight lines, especially useful for intricate designs or tight spaces.
Our Precise and Methodical Approach to Ensure Perfect Edges Every Time
I recall a project where we had to paint intricate designs on a client’s living room walls. Using our precise taping techniques, we were able to create clean, sharp edges that made the patterns pop. The client was thrilled with the outcome, and the room looked like it had been done by a high-end interior designer.
High-Quality Materials
Importance of Using the Best Painter’s Tapes and Materials Available
Using high-quality materials is non-negotiable for us at Lightmen Painting. We rely on tapes like FrogTape and 3M ScotchBlue, which are known for their excellent adhesion and clean removal. These tapes are designed to work on a variety of surfaces, ensuring that we get the best results regardless of the material we are painting.
How Our Choice of Materials Leads to Superior Finishes
In one project, we were tasked with painting a historic home with delicate wooden trims. Using top-tier painter’s tape, we were able to protect the trims and achieve a perfect finish without any damage. The homeowner was impressed by the care and precision of our work, which preserved the integrity and beauty of the historic features.
Training and Experience
Highlighting the Extensive Training and Experience of Lightmen Painting’s Team
Our team undergoes rigorous training to master various taping techniques and stays updated with the latest industry practices. This ensures that every painter on our team can handle even the most challenging taping tasks with confidence and skill.
A Challenging Project Where Expertise in Taping Made All the Difference
I remember a particularly challenging project where we had to paint a multi-colored mural on a textured wall. The texture made it difficult to achieve clean lines, but thanks to our team’s expertise and advanced taping techniques, we were able to deliver a stunning result. The mural looked flawless, and the client couldn’t believe how crisp the lines were despite the wall’s texture.
Practical Tips for DIY Enthusiasts
For those looking to tackle painting projects on their own, here are some practical tips to help you achieve professional results with your taping.
Start Small
Advice for Beginners to Practice Taping on Small Areas Before Tackling Larger Projects
If you’re new to taping, start with small projects to build your confidence and hone your skills. Practice taping and painting a small accent wall or a piece of furniture before moving on to larger, more complex areas.
How Mastering Taping on a Small Project Builds Confidence
I once advised a friend to start by painting a small bookshelf. After mastering the taping and painting on that small project, they felt much more confident tackling their living room, leading to a much better result.
Invest in Quality Tape
Recommendation to Invest in High-Quality Painter’s Tape for Better Results
Using high-quality painter’s tape is worth the investment. It might seem more expensive upfront, but it saves you time and money in the long run by reducing the need for touch-ups and ensuring clean lines.
The Cost Savings in the Long Run Due to Reduced Need for Touch-Ups
I’ve seen many DIYers skimp on tape and end up spending more on additional paint and supplies to fix bleeding edges. Investing in good tape from the start can save you from these headaches and additional expenses.
Patience is Key
Emphasis on Taking Time to Tape Properly for the Best Results
Patience is crucial when it comes to taping. Rushing through the taping process can lead to mistakes that are difficult and time-consuming to fix. Take your time to apply the tape carefully and ensure it’s properly sealed.
Maintenance and Touch-Ups
Taping is an essential part of any painting project, but it's not just about applying tape and forgetting it. Maintenance and touch-ups are crucial to ensuring a flawless finish. Here’s how you can keep your project looking perfect throughout the painting process.
Regular Inspections
Importance of Inspecting Taped Areas Regularly During a Project
Regular inspections are key to catching any issues early before they become bigger problems. As you paint, keep an eye on the taped edges to ensure the tape is still adhering properly and no paint is seeping underneath. A quick check every now and then can save you hours of touch-up work later on.
How Catching Mistakes Early Can Prevent Major Issues Later
During a recent project, I noticed that a small section of tape was starting to lift due to the moisture in the room. By catching it early, I was able to press it back down and avoid paint bleed. This quick fix prevented a potentially time-consuming touch-up session after the paint dried.
Touch-Up Tips
Tips on How to Touch Up Small Areas if Paint Bleeds Under the Tape
Even with the best preparation, sometimes paint can bleed under the tape. Here’s how to handle these minor mishaps efficiently:
- Wait for the Paint to Dry: Before attempting any touch-ups, make sure the paint is completely dry. Trying to fix wet paint can cause smudges and further mess.
- Use a Small Brush: For precision, use a small, fine-tipped brush to carefully apply touch-up paint. This helps you stay within the lines and achieve a smooth finish.
- Match the Paint: Ensure you use the same paint used originally. Mixing paints or using different batches can result in slight color variations that are noticeable under certain lighting conditions.
- Feather the Edges: To blend the touch-up seamlessly with the rest of the painted area, feather the edges of the touch-up paint slightly. This technique helps create a smooth transition and hides the touch-up area effectively.
Using a Small Brush and Matching Paint to Fix Minor Imperfections
I recall a project where a tiny amount of paint had bled under the tape on a detailed trim. Using a small artist's brush and the same paint, I was able to correct the imperfection without anyone noticing. The client was impressed with the seamless finish and couldn’t believe there had been a touch-up at all.
Let's Leave With This
Avoiding common taping mistakes is crucial for a flawless paint job. Regular inspections and being prepared for touch-ups can ensure your painting project stays on track and looks professional. We take pride in our expertise and meticulous approach to taping and painting.
If you're planning a painting project and want to ensure perfect results, consider reaching out to us. Our team is dedicated to delivering exceptional results while maintaining a safe and healthy work environment. There's nothing quite like the satisfaction of a perfectly taped and painted room. Feel free to share your own taping tips or questions in the comments – we’d love to hear from you!
Do You Have Questions? Give Us A Call With Any & All! 503-389-5758
-
People Also Ask:
Why is it important to use ergonomic tools while painting?
Using ergonomic tools reduces the risk of strain and injury, enhances comfort, and increases efficiency. These tools are designed to fit better in your hand, reduce effort, and minimize the physical stress of painting tasks, leading to a more comfortable and productive painting experience.
What are the best practices for maintaining good posture during a painting project?
To maintain good posture, keep your spine aligned and avoid overreaching by using appropriate tools like extension poles for high or difficult-to-reach areas. Also, change your position frequently to prevent muscle fatigue and use ladders appropriately to maintain a natural posture while painting.
How can painters minimize physical strain during long projects?
Painters can minimize strain by taking regular breaks to rest and stretch, using ergonomic tools that reduce the effort required, and implementing proper techniques that distribute the workload evenly across different muscle groups. Additionally, maintaining a clean and organized workspace can prevent unnecessary movements that contribute to strain.
-

If your in the Portland, Or. area and need advice or a free no obligation estimate call us at 503-389-5758 or email scheduling@lightmenpainting.com
Thanks for stopping by Lightmen Daily! Stay tuned for more practical tips and expert advice on making your painting projects flawless, from wall to floor!
Definitions
- Ergonomic Tools: Devices designed to facilitate comfort, efficiency, and safety in the workplace, helping to minimize physical stress and injury.
- Posture: The position in which someone holds their body while standing or sitting, important in preventing occupational injuries during repetitive tasks.
- Stretching: The process of gently elongating muscles before and after physical activity to increase flexibility and reduce injury risks.
- Strain: Physical stress or discomfort affecting muscles or tendons, often resulting from overuse or improper use during activities.
- Painting Techniques: Specific methods or strategies used to apply paint effectively, impacting the overall ease and quality of the painting project.
- Breaks: Pauses in work activity, allowing for rest and recovery, crucial for maintaining long-term productivity and health.
- Workplace Adjustment: Modifications made to the work environment to enhance comfort and efficiency, such as arranging tools within easy reach or optimizing workspace layout.
- Repetitive Motion Injuries: Injuries caused by repeated motion or overuse of a body part, common in professions requiring frequent, similar movements.
- Efficiency: The ability to accomplish a job with the minimum expenditure of time and effort.
- Safety Practices: Methods or procedures that are followed to ensure the safety of individuals performing tasks, crucial in preventing accidents and injuries.
Lightmen Painting Serving: Portland, Tigard, Lake Oswego, Tualatin, West Linn, Milwaukie, Sherwood, Happy Valley, Oregon City, Beaverton, Hillsboro, Gresham